Following my original idea I wanted to create a panorama going from day to night. Unfortunately once I got back it on the computer it became clear that it was going to be very difficult to stitch and wasn't going to look as good as I hoped. Firstly, not using a tri/monopod meant that I wans't able to keep the camera in the same location so the angles don't aline. The only way I could get it to join was using the warp tool but that also disfigured the rest of the photo. And secondly I didn't take as many photos of the transition between day and night as I should have done so the fade isn't subtle.
Below is my rough stitch I did by hand.
Friday, 28 December 2012
Thursday, 20 December 2012
Panoramas
Before making my final panorama I experimented with a few different styles and locations to generate ideas.
I think this scarf picture would have worked really well as a full panorama with its vibrant colour. It would have also had an eye catching pattern. However as you can see when it came to stitching it didn't work because the scarves were being moved.
This panorama uses a slight dutch tilt. The grey hue and impending cloud looks really dramatic but I would have liked to of included more of the crowd.
I created this panorama by adjusting the clarity whilst in camera raw. Originally I really liked it and was going to submit this as a final piece. However after looking at it over the course of a few days and gaining peer feedback I changed my mind. It does look over edited and looks quite tacky although it does have that dramatic, tense feel I wanted.
Monday, 3 December 2012
Polarising Effect
I'd seen some edited photos I liked that looked like mini planets. I thought that it would be a good challenge to attempt as well as hopefully improving my skills on Photoshop.
To create the effect I needed a photograph that would wrap around and join up. This is the closest one I had (a holiday snap from America.)
All I simply had to do then was flip the image upside down and use the Photoshop polarise effect. This pulls the image into the centre and creates this planet like effect.
This is the final outcome. It took a few re-attempts to line up. I had to completely delete the sky and create my own using a gradient because it wouldn't stitch.
Monday, 26 November 2012
David Hockney Inspired Pictures
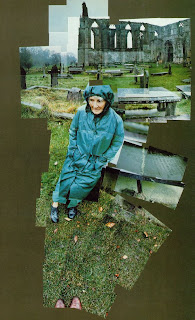
I was looking back through my blog at the photographers I'd looked at for inspiration. I looked at David Hockney's My Mother, Bolton Abbey, Yorkshire again and it gave me a few ideas to practise with.
Here is my first panorama I tried out.
As you can see it is one I have stitched by hand which is why it's quite rough and the colour's don't mix particularly well. However it was time well spent I thought because it gave me a chance to experiment and better understand panoramas.
Here is my second one - a circular panorama
I was quite impressed with how this turned out. Fortunately it didn't require any stitching from me either. Using the Photoshop photomerge tool it joined it all together for me. It did make me feel confident though that I was overlapping a good amount.
Monday, 19 November 2012
Chandeliers
These two pictures were from my trip to the Guild Hall I spoke about in the last post. These were two of my favourites. I had to take them hand-held because I had no tripod and nothing to rest on them so it was important I got the aperture and shutter speed balance right.
I think they came out quite good considering they were hand-held. I did take some brighter ones but I prefered these darker ones. I think there more in keeping with the victorian-esque style of the building.
I think they came out quite good considering they were hand-held. I did take some brighter ones but I prefered these darker ones. I think there more in keeping with the victorian-esque style of the building.
Saturday, 17 November 2012
Development Photos
Over the past few weeks I've been practising using different camera techniques hopefully so that I can implement some of them into my final panorama.
To achieve these photos I had my aperture on a low setting. Because it was nice, bright day I was able to keep my shutter speed fast so they are crisp focus.
In these two pictures above I had to use a quick shutter speed to capture the birds in flight without them blurring. I really like the second one with the reflection as well as the elderly couple that bring a story to the picture.
This series of three pictures were taken at the Guild Hall in Worcester. I took a picture of one of the chandeliers and it came out blurred because I left the shutter open for too long accidentally. I then remembered what we'd done in class and thought it would be a great opportunity to try this technique out.
I have recently added this picture to the list. Its Steven Gerrard taking a corner kick at the Liverpool Vs Reading game I recently went too. I was quite pleased with the final result because I didn't have long to get the camera set up. Its a little bit too blurred though and out of focus. It would have looked better if I'd had a tripod and quickened the shutter speed slightly so it isn't so blurred.
Shallow Depth of Field
 |
To achieve these photos I had my aperture on a low setting. Because it was nice, bright day I was able to keep my shutter speed fast so they are crisp focus.
Shutter Speed
In these two pictures above I had to use a quick shutter speed to capture the birds in flight without them blurring. I really like the second one with the reflection as well as the elderly couple that bring a story to the picture.
This series of three pictures were taken at the Guild Hall in Worcester. I took a picture of one of the chandeliers and it came out blurred because I left the shutter open for too long accidentally. I then remembered what we'd done in class and thought it would be a great opportunity to try this technique out.
Sunday, 11 November 2012
Photography Research - Will Pearson
Will Pearson is a professional photographer who lives in London. He specialises in taking panorama pictures and has a wide array of them on his website. (http://www.willpearson.co.uk/)
The Shard View, Night
The Birds
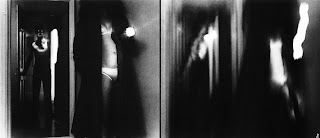
These pictures illustrate how shutter speed can be used to create an interesting picture.
Thursday, 8 November 2012
Photography Research - Ed Jacobs
After spending a few sessions in class learning about camera settings and what they can achieve we have finally begun the main project: creating our own panorama. I will need to use a series of images I taken and then seamlessly stitch them together in Photoshop.
For inspiration and ideas I have and will continue to research photographers.
Below is a link to a photographer's blog. His name is Ed Jacobs and has been regularly updating his blog since early 2008.
I thought the wavy technique he's used in his set of panoramas was particularly interesting because it created an unusual, rare effect.
Saturday, 27 October 2012
Research from The Photography Book
The Photography Book
I've now been set the main project brief which is to create my own panorama on anything I like, focusing on either depth or motion. I have decided that the best place to probably start is by researching other photographers so that I can gain some inspirations for ideas myself.
I have been looking through a book thats been recommended a lot on the course: The Photography Book. Below is a list of some of the photographs that I thought stood out.
Gabriele Basilica - Le Treport - 1985
John Davies - Allotments Overlooking Easington - 1983
Pg 110
Paul Fusco - Finca El Encanto, Mexico - 1994
Pg 164
Harry Gruyaert - Ouarzazate, Morocco - 1985
Pg 187
John Hilliard - X - 1982
Pg 202
David Hockney - My Mother, Bolton Abbey, Yorkshire - 1982
Pg 204
Frank Hurley - The Endurance By Night - 1915
Pg 220
Nick Knight - Susie Smoking - 1988
Pg 248
Jacques-Henrie Lartigue - Gerard Willemetz and Dani - 1926
Pg 262
Gustave Le Gray - Sea and Sky - 1856
Pg 265
Source: The Photography Book
Phaidon Press Limited, 1997. The
Photobook. 1st ed. London: Phaidon.
Tuesday, 9 October 2012
First Task - Face Merge
Our first task was based on Photoshop. The aim was to merge two different people's faces together to create a believable person.
We each took a picture of ourselves in a passport style. Once everyone in the class had done this we partnered up and began merging.
Below is my picture
My first partner was James.
I began by uploading both pictures into Photoshop. I set James's face as the top layer and lowered the opacity to 50% so I could see my picture beneath. I resized and rotated them so they were both the same (using both our left eyes as an anchor reference point.) I then used a vector mask and began to rub away at the top layer to reveal parts of my face underneath.
As I was doing this I was quite shocked at how much our skin tone actually differed. It was clear I needed to adjust the colour balance to make them mould better. I had to redo this a couple of times because parts were getting coloured that I didn't want to (such as the eyes and background.)
Below is my final edit
("He" reminds me of an American trucker)
After completing one and enjoying it I was keen to practise more and so did another one.
This time I partnered up with Bessam.
On this edit I used myself as the main picture and rubbed away to use Bessam's eyes, eyebrows and mouth.
What issues does this raise technically?
I found the key to making the photographs believable was to get the two skin tones right. I had to adjust the picture's levels, hue, saturation and colour levels to get a realistic look.
I used the pen tool to create selections as not to rub out certain things. For example: I couldn't rub out too far from the jawline as the person's ears underneath would appear.
What issues does this raise philosophically and ethically?
There is a lot of debate about the use of Photoshop in magazines and online etc. Many argue that it objectifies humans and creates damaging images (such as the size 0 models for example) that encourage unhealthy lifestyles and a chase for the unobtainable "perfect" image.
What do you need to consider when planning a photo shoot of this type?
One thing I noticed was the difference in shadows on the face, particularly in mine and James's merge. He has a shadow on the right side of his face whereas I have one on the left. I couldn't really fix this problem in Photoshop so if I were to re-do it I would make sure we were both in the same lighting conditions.
Me and James used different cameras. Although this didn't affect our picture to drastically I noticed in some of my classmate's it was much more obvious.
Subscribe to:
Comments (Atom)


